Introduction
Tarun is trying to make a pattern using squares and rectangles. Let us watch this video to know what pattern it is and how it will be made.
In the video above, we learnt why we need practical geometry.
Practical geometry is a branch of geometry in which we learn the method of constructing various geometrical shapes like line segments, angles, triangles, and different polygons.
We use various geometrical tools to construct the required shapes with the exact measurements given.
Geometry helps bring shapes and lines to life by forming meaningful images. Everything around us is constructed and has measurements. Hence, it is important to know how shapes, angles and lines are constructed.
- Practical geometry allows you to construct geometric shapes using simple tools such as protractor, compass, ruler, etc. You may not realise it, but every time you draw something, you make use of such shapes and lines.
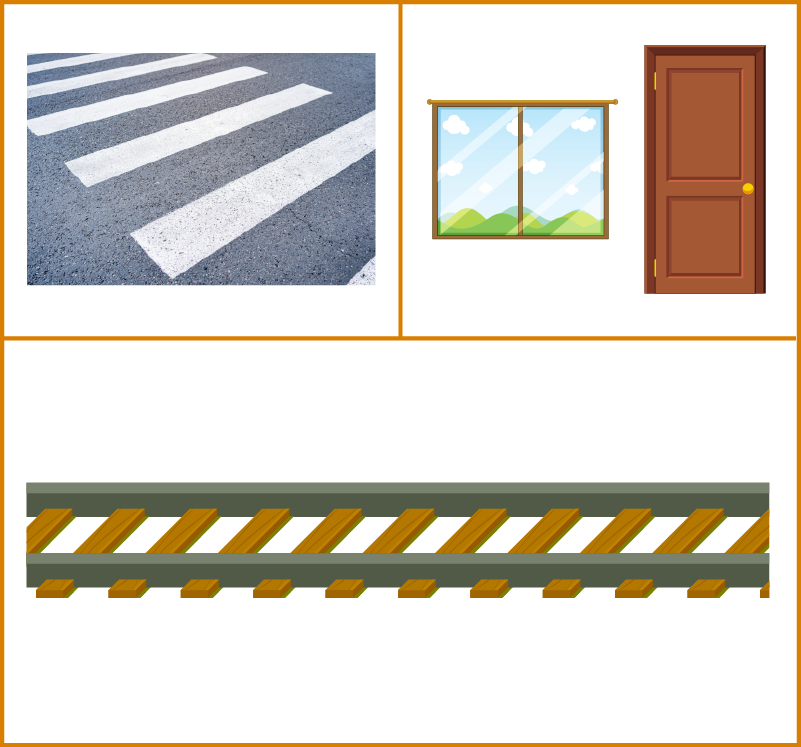
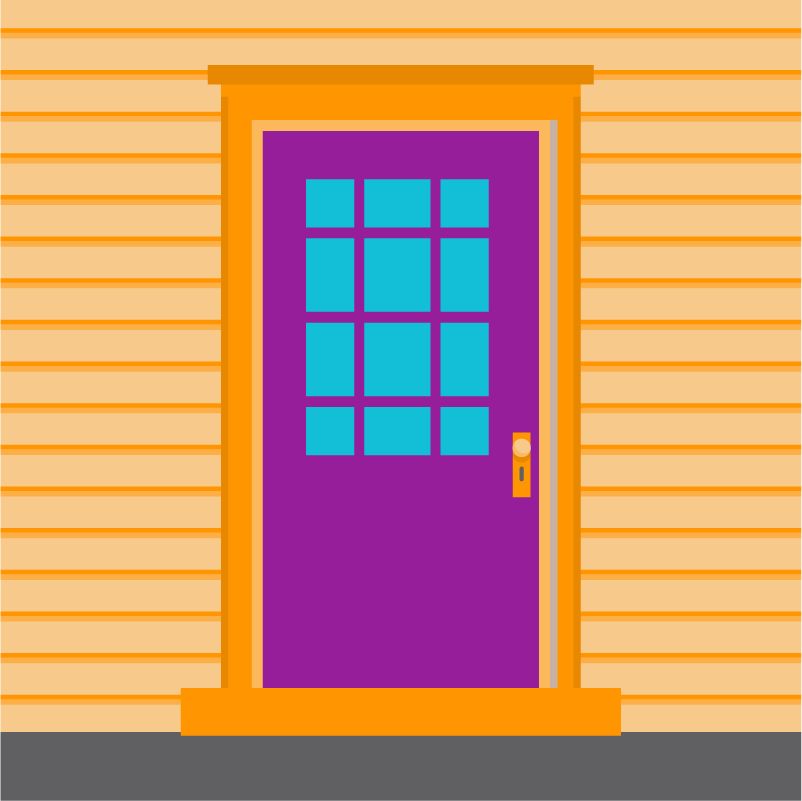
For example, take a sheet of paper and draw a simple house.

Look closely, you will notice shapes such as rectangles for the building, door and chimney, squares for windows, triangle for the roof and circle for door lock. These shapes can be drawn more efficiently using a ruler and compass.
Concepts
The chapter ‘Practical Geometry’ covers the following concepts:
Instruments Required For Construction
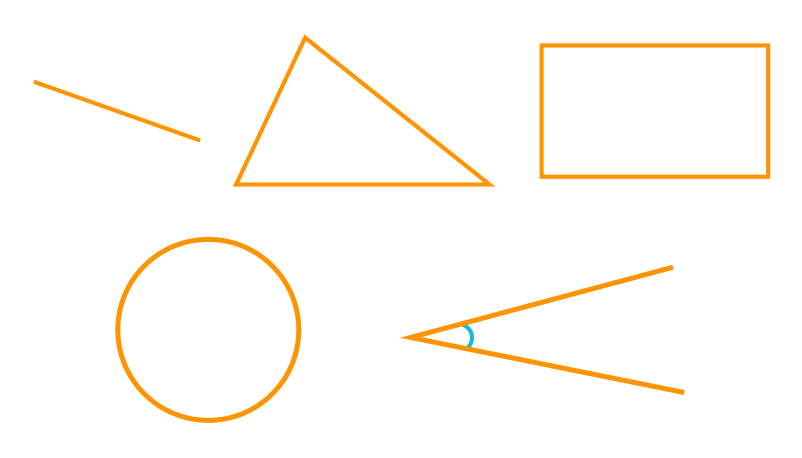
We come across several shapes in our day-to-day life. You are already aware of a few of them such as triangles, squares, rectangles, circles and so on. To draw these shapes, there are different types of tools with different names. These tools are called geometric tools.
We shall begin with listing these tools, describing them, and looking at how they are used.
Ruler
- It is also known as the straight edge.
- A ruler ideally has no marking on it.
- However, for our convenience, it is graduated into centimetres and millimetres on one side, and into inches on the other side.

Uses
- A ruler is used to draw a straight line and measure the length of a line segment.
Compass
- It is a pair – a pointer on one end and a pencil on the other end.
- The distance between the pencil and the pointer is adjustable.
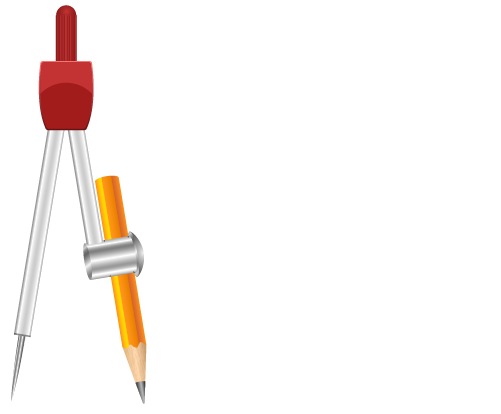
Uses
- To draw arcs and circles.
- To construct angles.
Divider
- It looks similar to the compass with its ‘V’-shaped structure.
- It is a pair of pointers.
- The distance between them is adjustable.
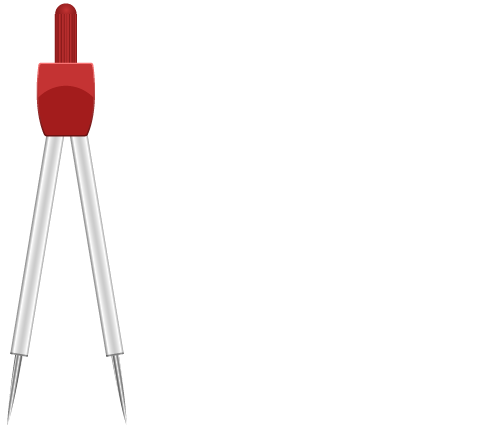
Uses
- It is used to compare lengths.
Protractor
- It is a semi-circular device graduated from 0 to 180 degrees and can be directly used to measure any angle within its range.
- It has two sets of markings, 0 to 180 degrees from the left to the right and vice versa.
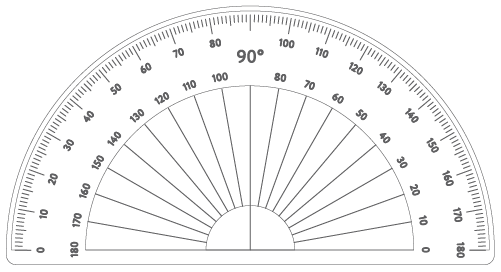
Uses
- A protractor can be used to measure and draw angles.
Set squares
- Two triangular tools.
- There are two kinds of set squares.
- One has the angles 45 degrees, 45 degrees and 90 degrees at the 3 vertices while the other has 30 degree, 60 degree and 90 degree angles.
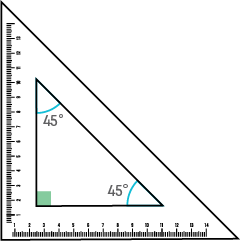
This set square has the angles 90 degrees, 45 degrees and 45 degrees.
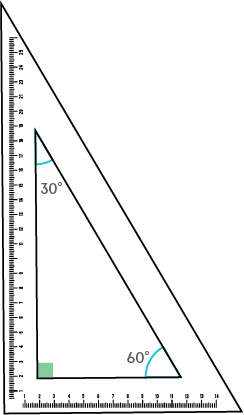
This set square has the angles 90 degrees, 30 degrees and 60 degrees.
Use
- These are used to draw perpendicular and parallel lines.
Circles
Let us learn how to draw a circle of radius 5 cm with a compass:
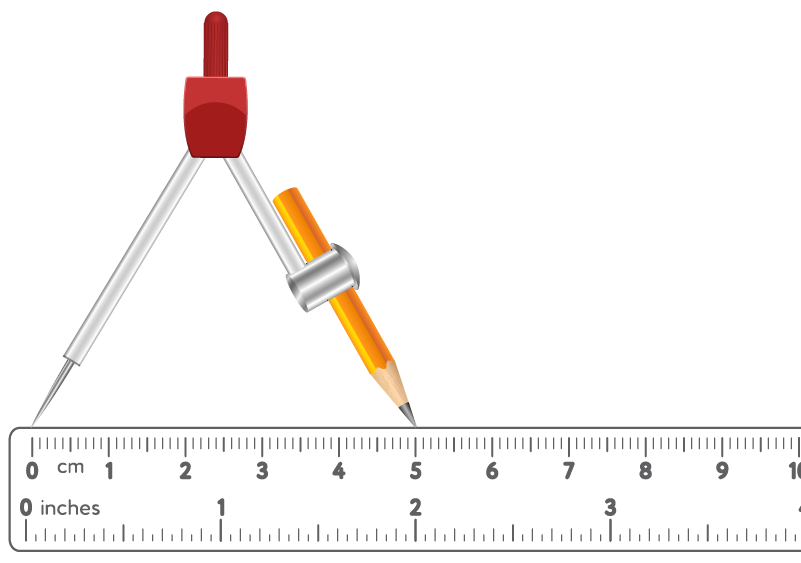
Step 1: Open the compass for the required radius of 5 cm.
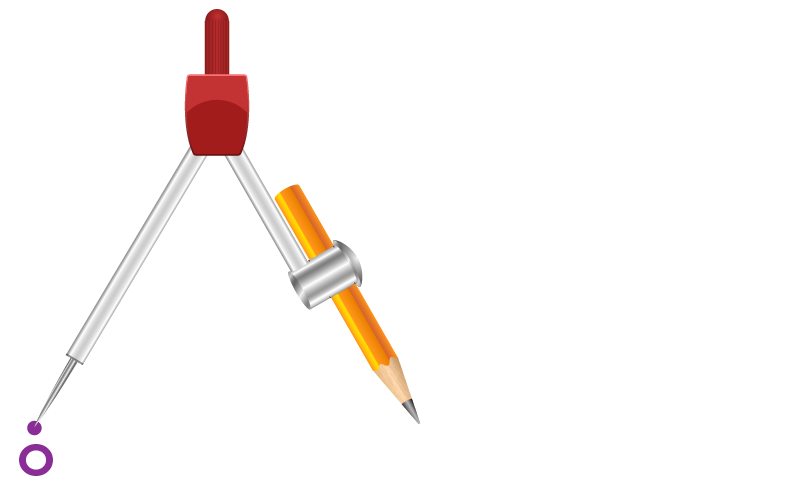
Step 2: Mark a point where we want the centre of the circle to be. Name it (say O).

Step 3: Place the pointer of the compass at O.
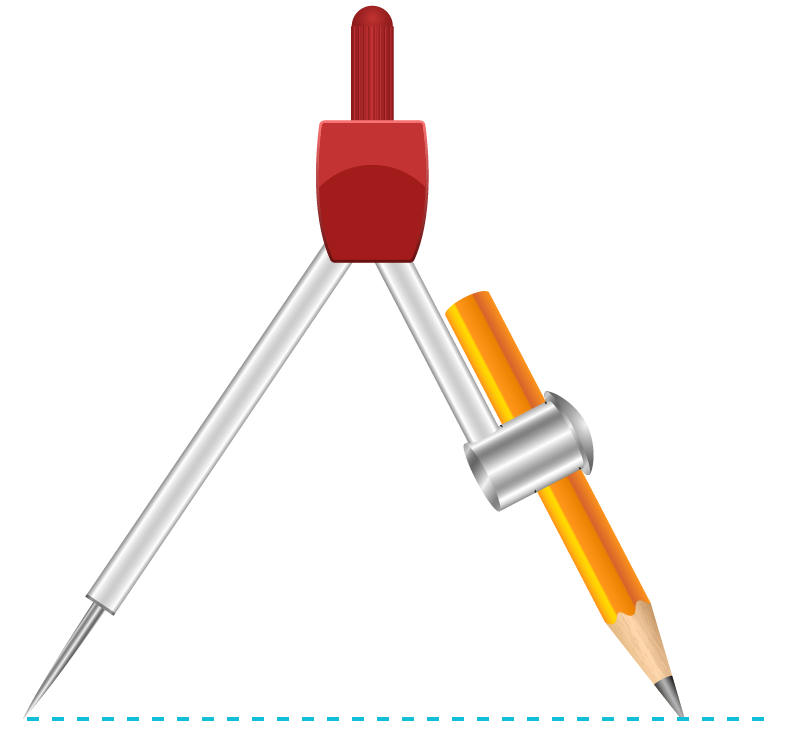
Step 4: Turn the compass slowly to draw the circle.

While using the compass we need to make sure that the compass pointer and tip of the pencil should be at the same level. If these are at different levels, the radius will change also we will not be able to draw the circle correctly.
- The pointer and the pencil tip are not at the same level


- The pointer and the pencil tip are at the same level
To draw two circles with the same centre and of radii 2.5 cm and 3.5 cm, follow these steps:
Step 1: Draw a circle of radius 2.5 cm.

Step 2: Draw a circle of radius 3.5 cm with the same centre.

Line Segments
We know what a line segment is. Let us understand how to draw a line segment using a ruler.
- Let us draw a line segment of length 5.3 cm.
Step 1: Take a ruler and mark a point ‘A’ at the zero mark of the ruler.
While marking ‘A’ we should look straight down at the ruler.
Step 2: From ‘A’ measure 5.3 cm and mark the point as ‘B'.
While marking ‘B’ we should look straight down at the ruler.


AB is the required line segment whose length is 5.3 cm.
Let us draw a line segment AB of length 4 cm and then extend it to the point C to get a line segment AC of length 6 cm.
Step 1: Draw a line segment AB = 4 cm using a ruler.

Step 2: Extend the line segment AB to C to get a line segment of 6 cm.
- The length of AB = 4 cm
- The length of the required line segment = 6 cm
- Hence, from 'B' we need to measure 2 cm to get the line segment AC of length 6 cm

- Join B and C

AC is the required line segment whose measure is 6 cm.
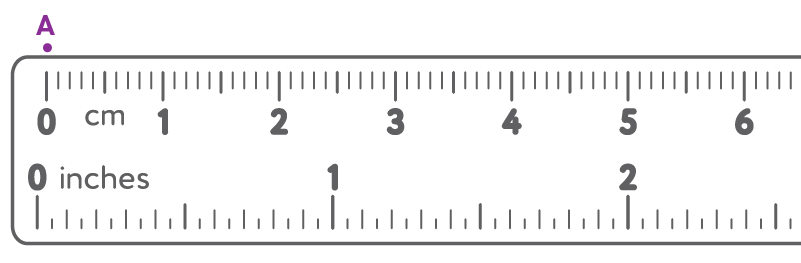
To construct a line segment of length 6.5 cm using a ruler and a compass, follow the steps below:
Step 1: Draw a line ‘l’. Mark a point A on the line ‘l’.

Step 2: Place the compass pointer on the zero mark of the ruler. Open it to place the pencil point up to the 6.5 cm mark.

Step 3: Place the pointer on A and draw an arc to cut ‘l’ at B.
Make sure that the opening of the compass remains the same.
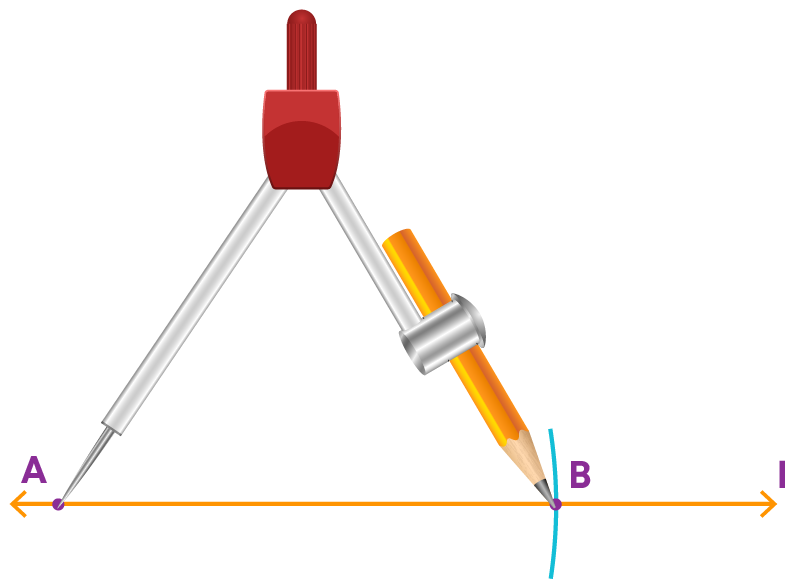
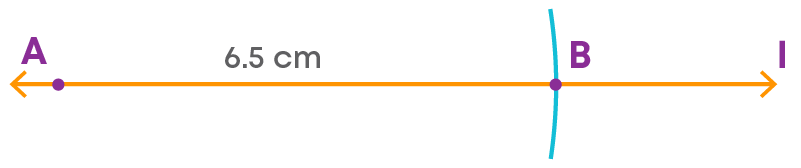
AB is a line segment of the length of 6.5 cm.
Remember
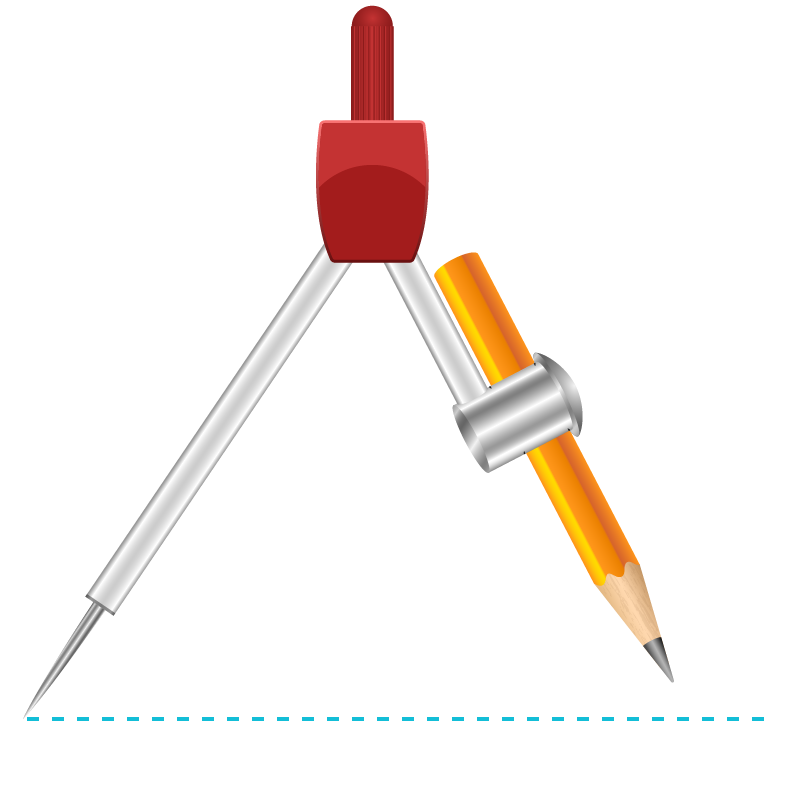
- While using the compass, we need to make sure that the compass pointer and tip of the pencil should be at the same level.
- If these are at different levels, the radius will change also we will not be able to draw the line segment of required length correctly.
The pointer and the pencil tip are at the same level

The pointer and the pencil tip are not at the same level
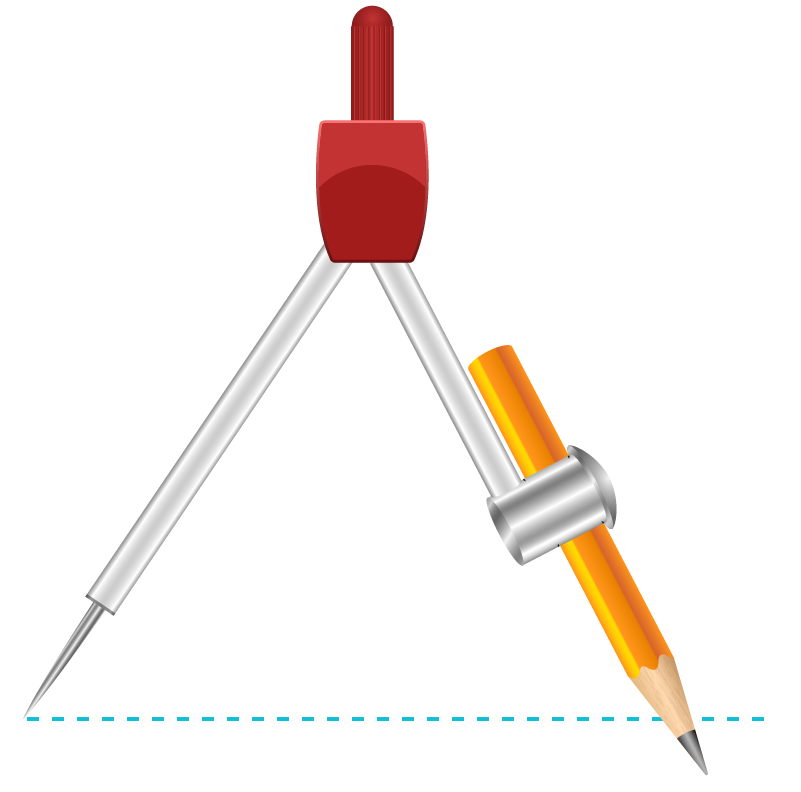
We have learnt how to construct a line segment using a ruler and compass but if we must draw a copy of the given line segment using a compass, how do we do it? We follow the given steps to construct a copy of the given line segment PQ using a compass:

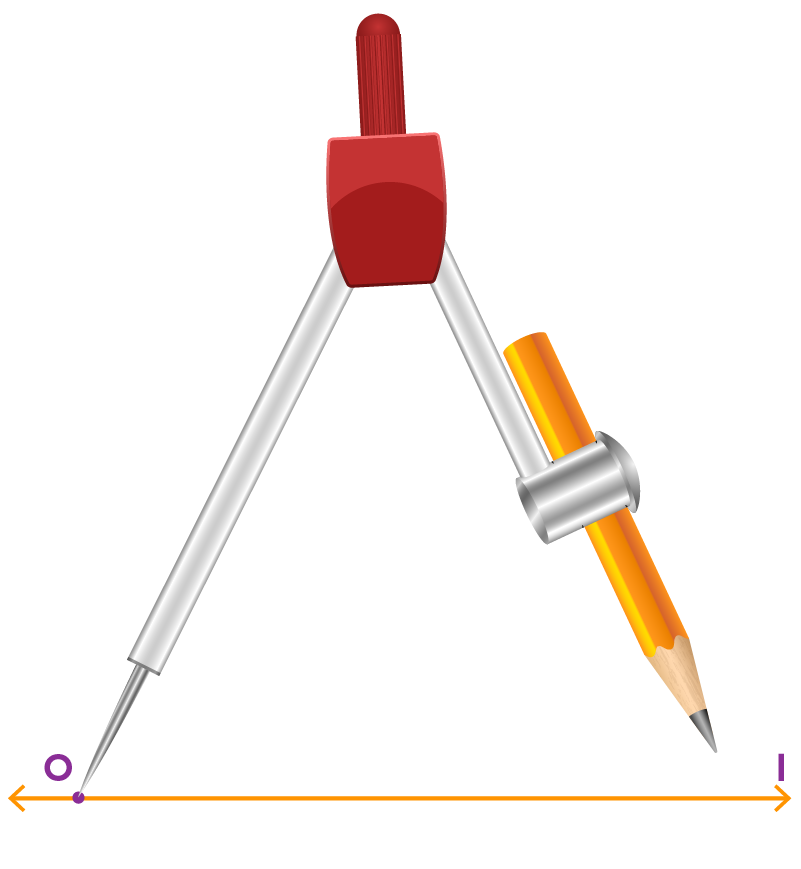
Step 1: Draw any line ‘l’. Choose a point O on ‘l’.

Step 2: Fix the compass pointer on P and the pencil point on Q.
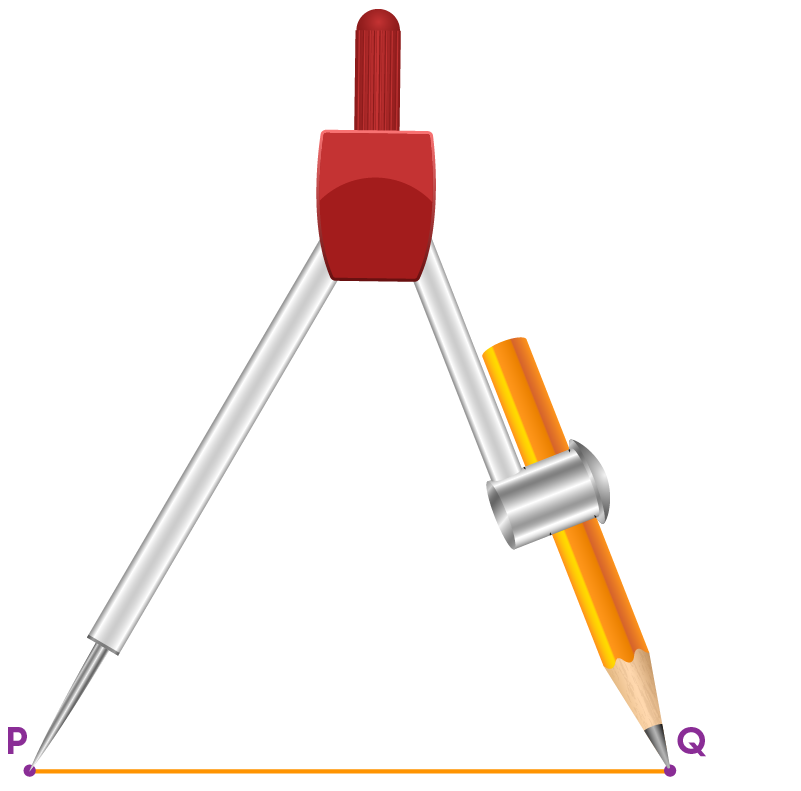
The opening of the instrument now gives the length of PQ.
Step 3: Without changing the compass setting, place the pointer on O.
Step 4: Draw an arc that cuts the line at a point, say, B
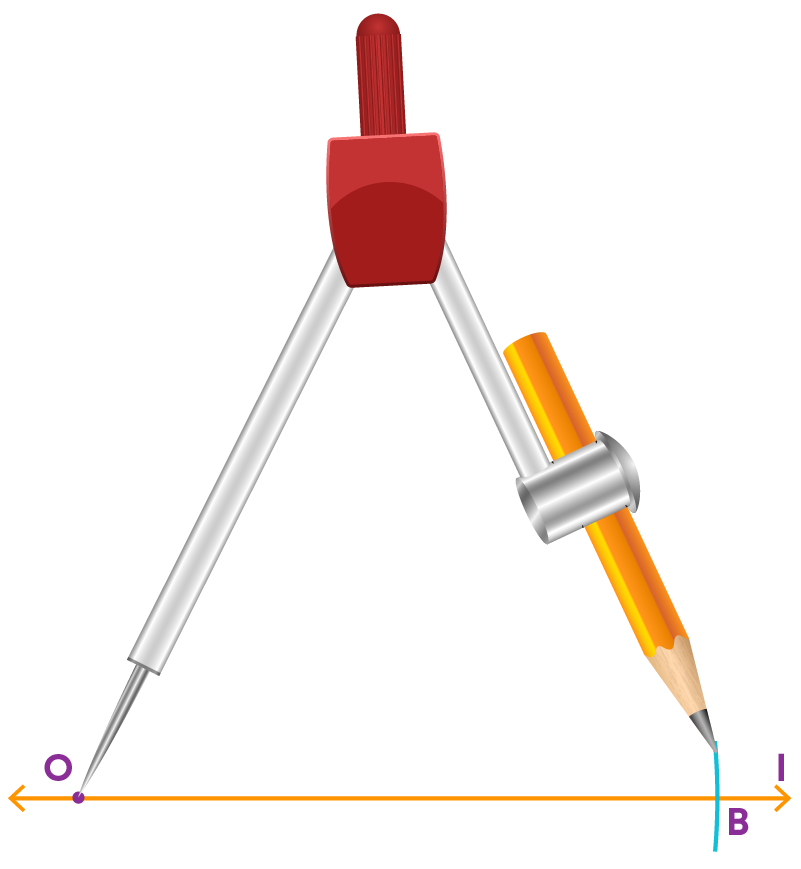

Now the line segment OB is a copy of the line segment PQ.
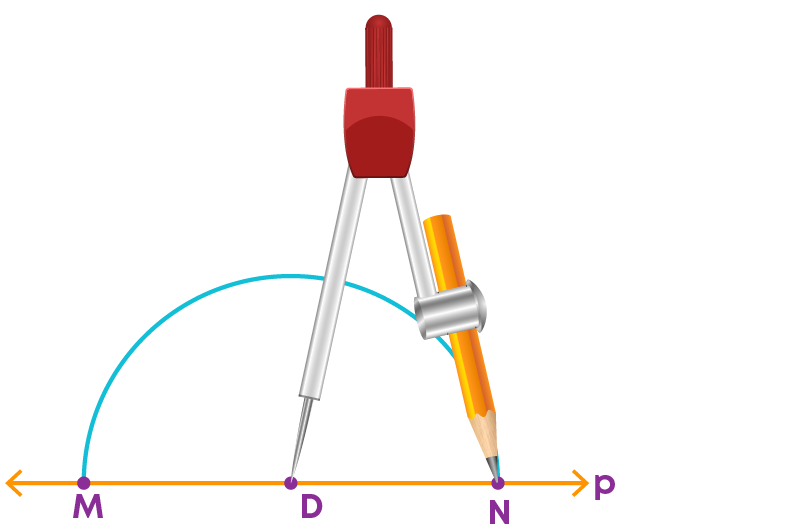
To construct a perpendicular to a given line through a point on it using a compass and a ruler follow these steps:
Step 1: Draw a line ‘p’ and mark a point on it, say D.

Step 2: With D as the centre and with a convenient radius, construct an arc intersecting the line at the two points M and N.
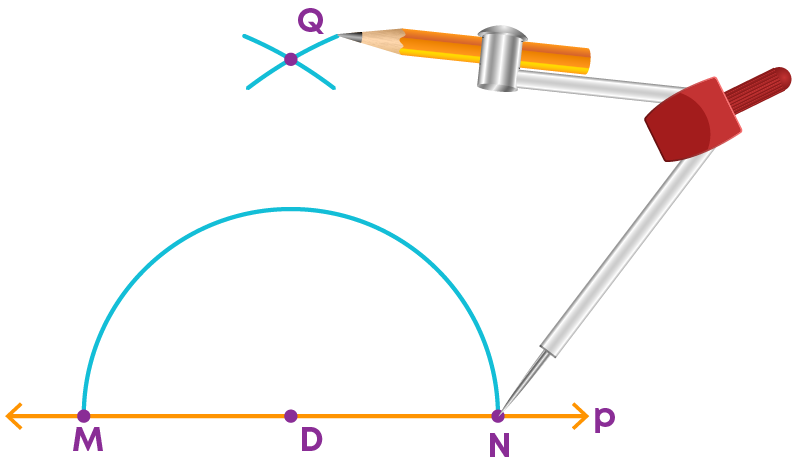
Step 3: With M and N as centres and a radius greater than MD construct two arcs, which cut each other at Q.
step 4: Join D and Q.
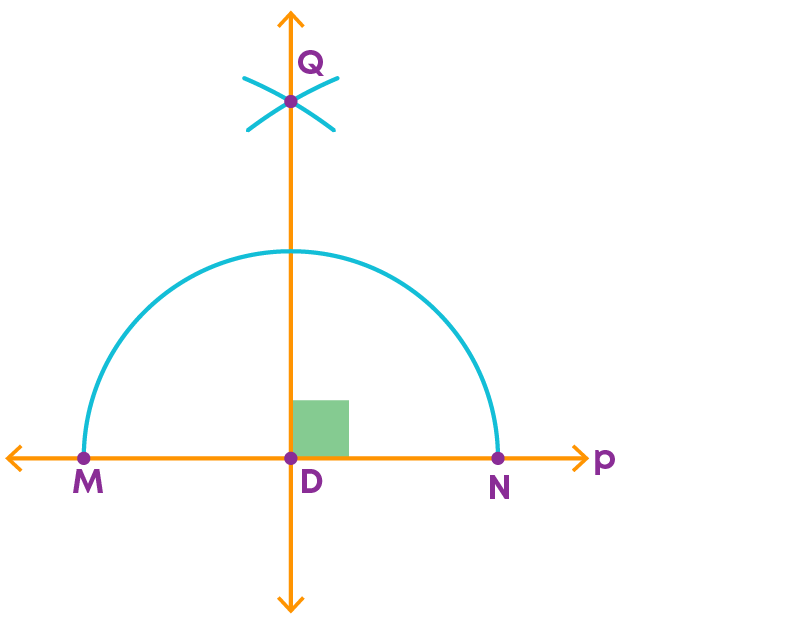
Then the line DQ is perpendicular to ‘p’.
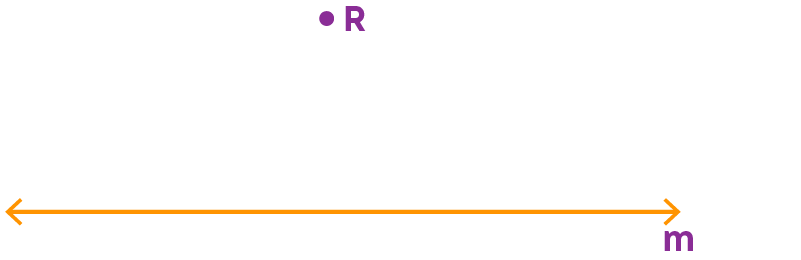
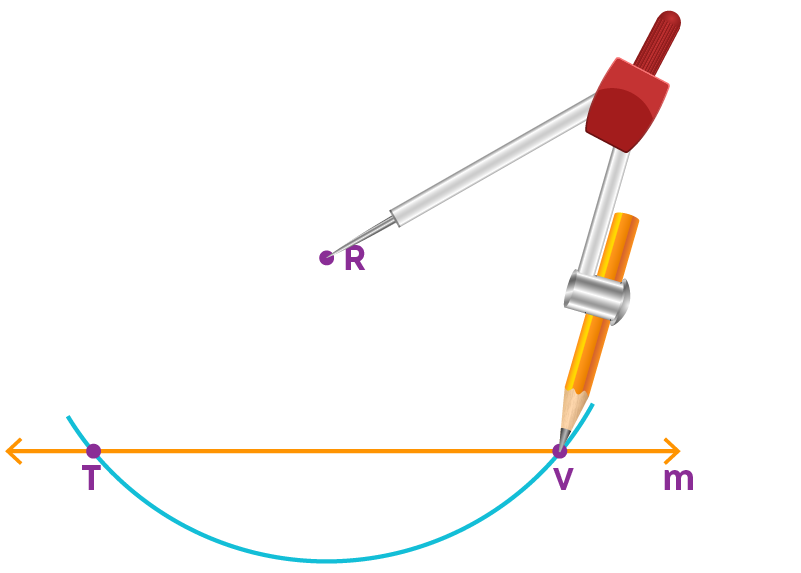
To construct a perpendicular to a given line through a point outside it follow these steps:
Step 1: Draw a line ‘m’ and a point R not on it.
Step 2: With ‘R’ as the centre, draw an arc which intersects line ‘m’ at two points T and V.
Step 3: With a radius more than half of TV and with T and V as centres, draw two arcs intersecting at a point, say G, on the other side of the line.
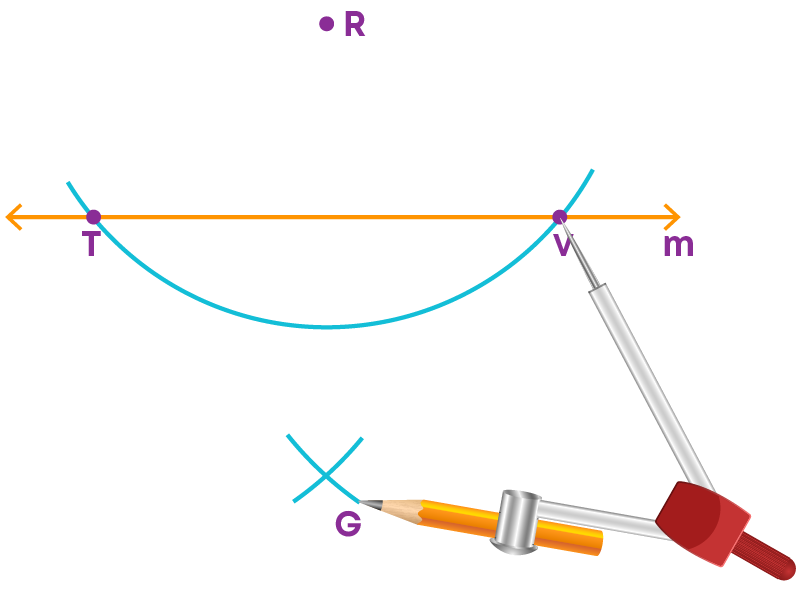
Step 4: Join R and G.
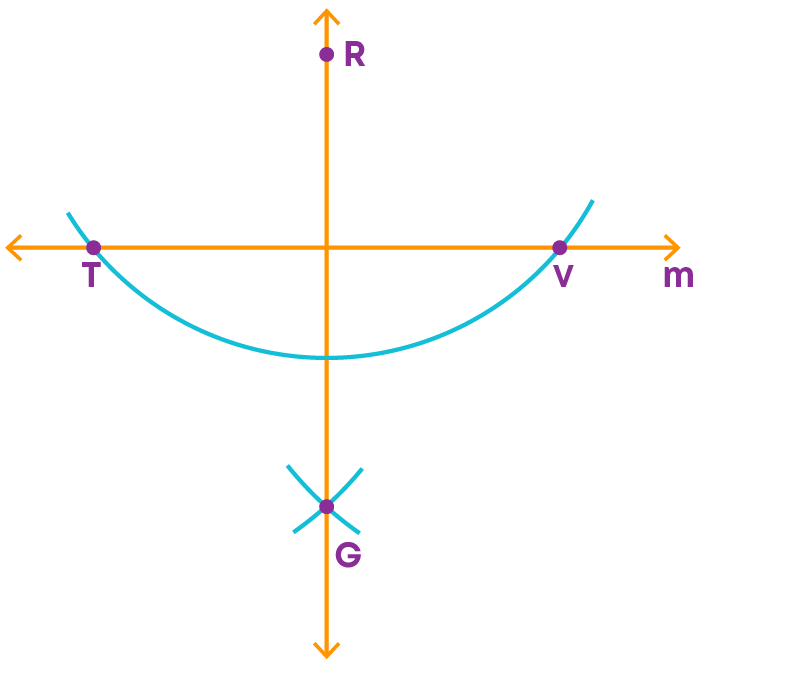
- The line RG is perpendicular to the given line 'm'.
- We write RG ⊥ m.
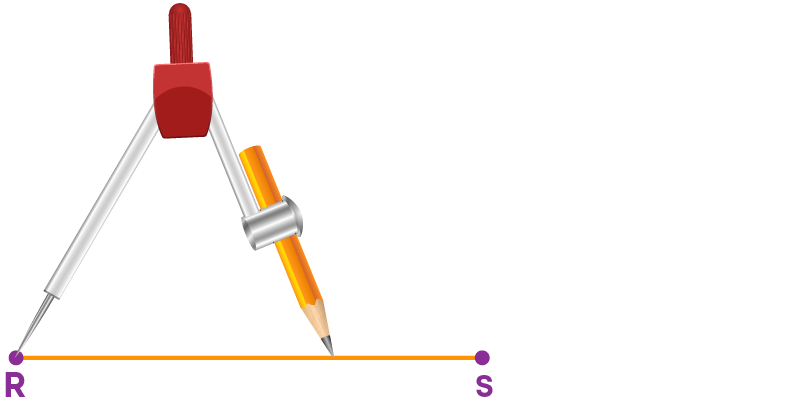
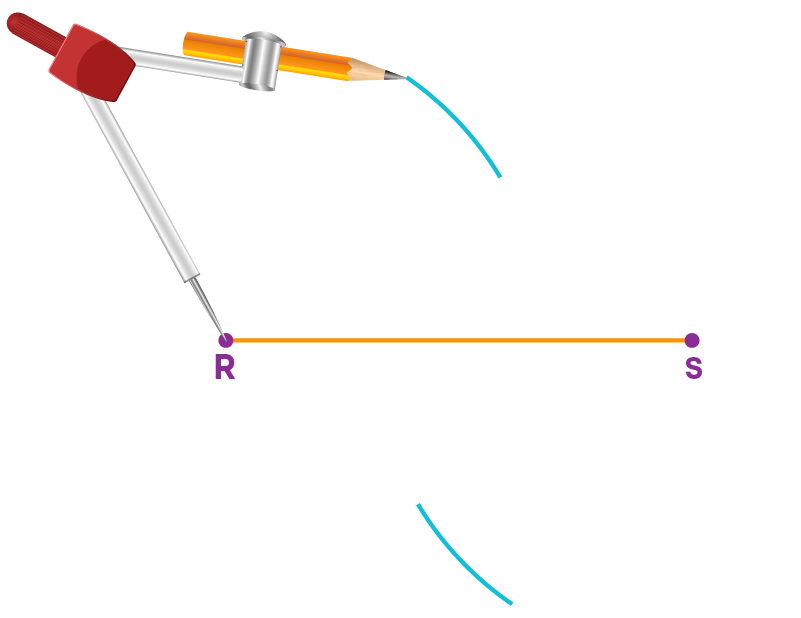
To draw a perpendicular bisector of a line segment, follow these steps:
Step 1: Draw a line segment RS of any length

Step 2: Keep the compass pointer at ‘R’ and adjust the width of the compass to more than half of the length of the line segment RS.
Step 3: With the same width, draw an arc on each side of the line segment RS.
Step 4: Keeping the pointer at ‘S’ with the same width cut the pervious arcs at M and N.
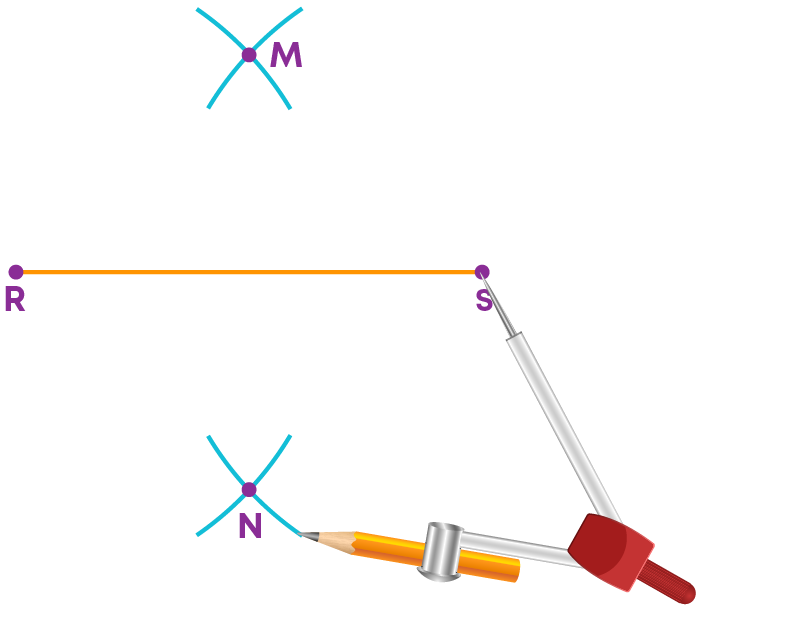
Step 5: Join M and N.
- The line segment MN cuts RS at ‘A’
- A is the midpoint of the line segment RS.
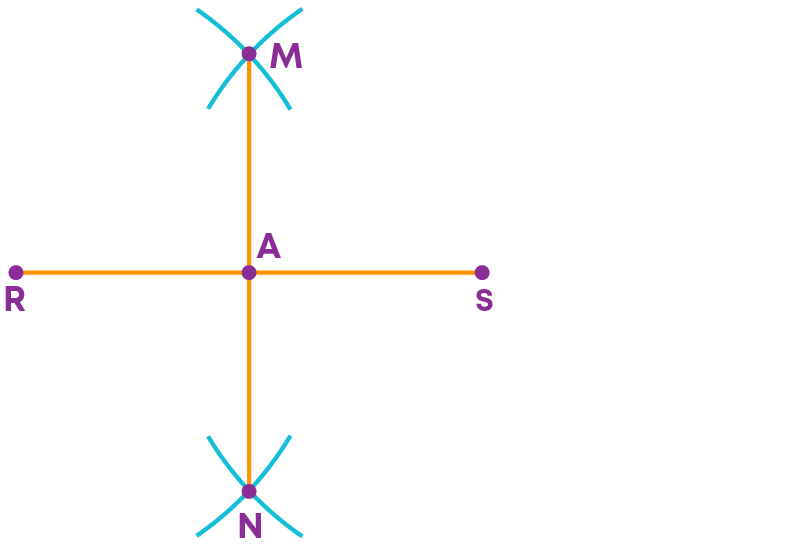
Thus, the line segment MN is the perpendicular bisector of the line segment RS.
Angles
We have learnt how to measure an angle using a protractor, but how do we draw an angle using a protractor?
Let us draw an angle of 50°. Follow the steps below to draw the angle:
Step 1: Draw a ray AB.

Step 2: Place the centre of the protractor (or origin) at A and the zero edge (or base line) coinciding with AB.
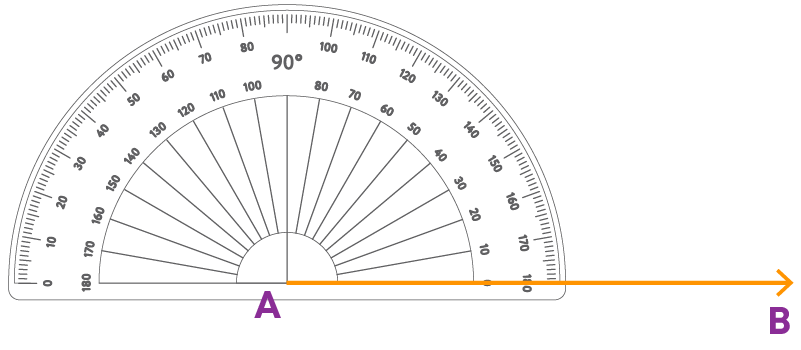
Step 3: Start with zero near B. Mark a point C at 50°.
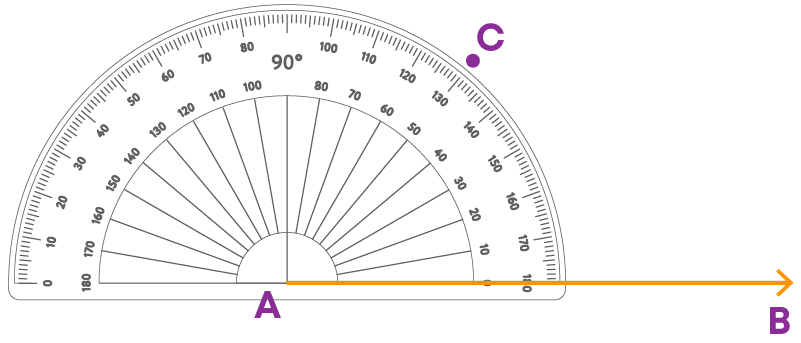
Step 4: Join A and C.
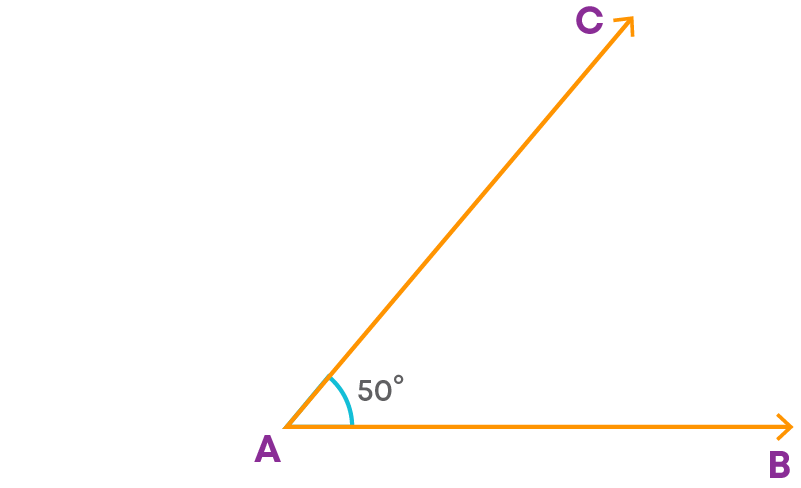
∠BAC is the required 50⁰ angle.
Now, we have ∠KPW. Let us construct a copy of this angle.
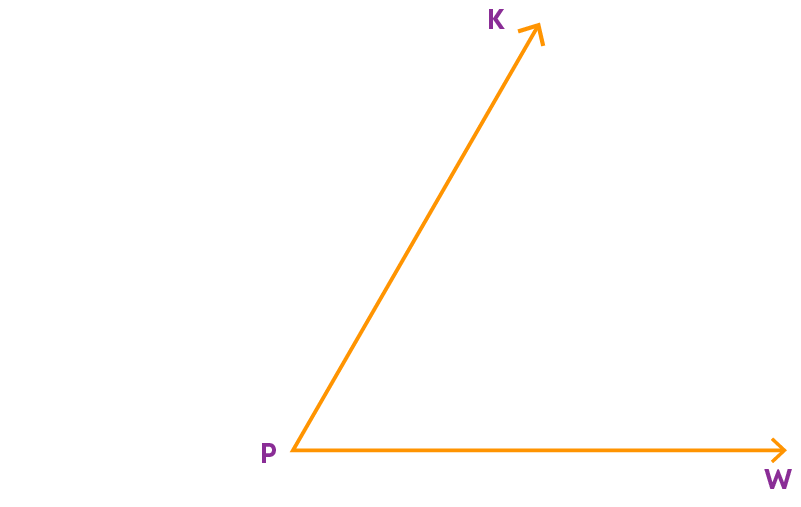
To do this, follow these steps:
Step 1: Draw a ray AB.

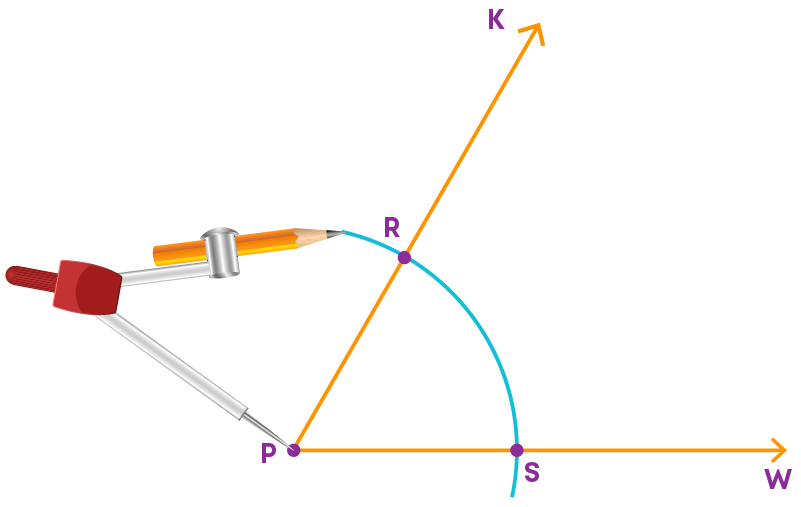
Step 2: Place the compass at point ‘P’ of the given angle.
Draw an arc to cut the arms of the angle at R and S.
Step 3: Use the same setting of the compass and draw an arc with A as center, cutting AB at G.

Step 4: Place the compass at S of angle KPW and set it to the length SR.
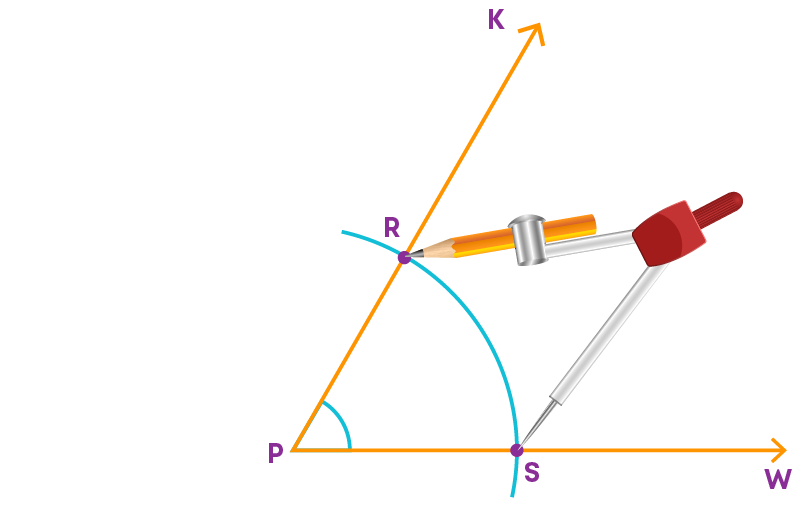
Step 5: With the same setting place the compass pointer at G and draw an arc to cut the previous arc at C.
Step 6: Join A and C.
The angle CAB has the same measure as the given angle KPW. Hence, ∠KPW = ∠CAB.
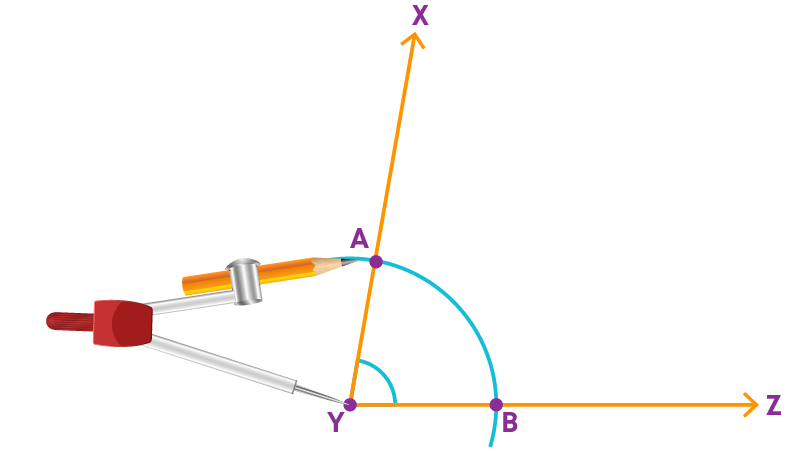
Now let us learn how to construct an angle bisector. We have angle XYZ. Let us construct its angle bisector.
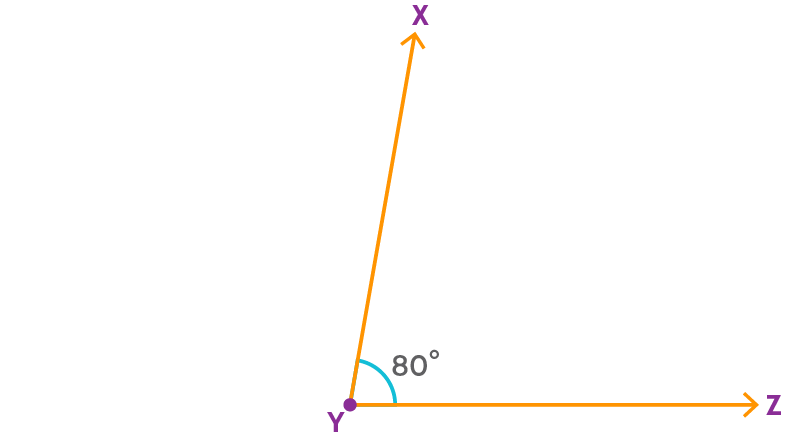
Step 1: With Y as centre draw an arc to cut the arms YX and YZ at A and B, respectively.
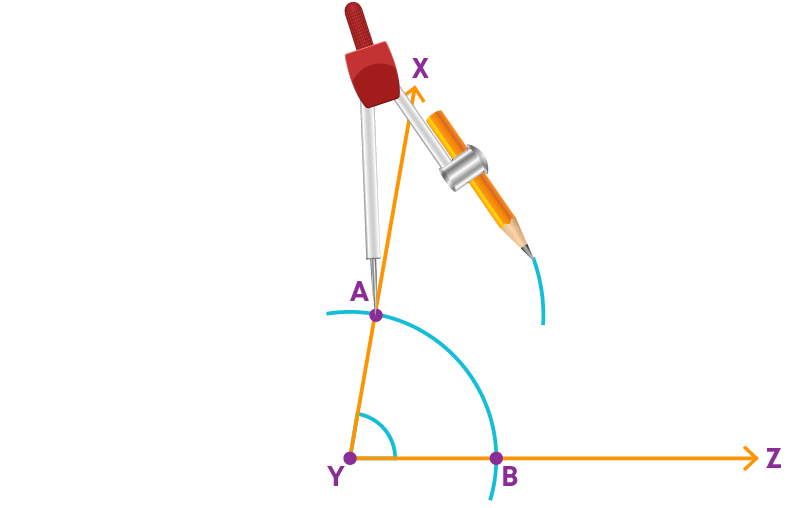
Step 2: With A as center, draw an arc in the interior of ∠XYZ. The width of the compass should be more than half the length of AB.
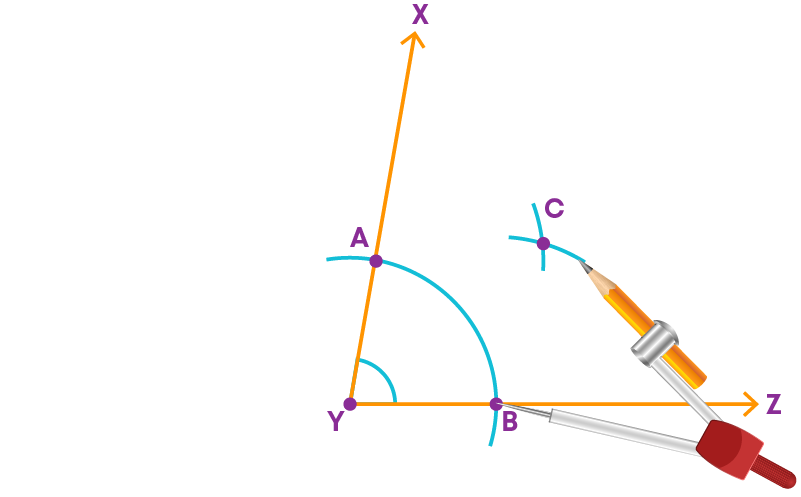
Step 3: With the same radius and with B as center, cut the previous arc at C.
Step 4: Join Y and C.
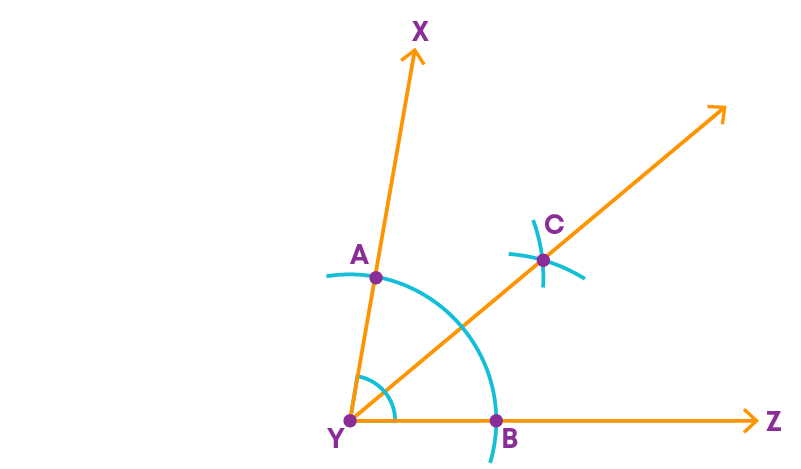
YC is the required bisector of the angle XYZ.
Constructing Special Angles Using A Compass And A Ruler
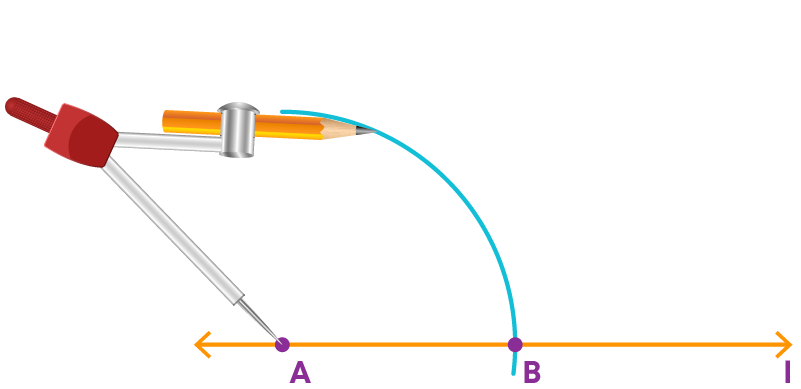
To construct a 60 degree angle follow the given steps.
Step 1: Draw a line ‘l’ and mark a point A on it.

Step 2: Place the compasses pointer at A. With a convenient radius draw an arc, cutting 'l' at B.
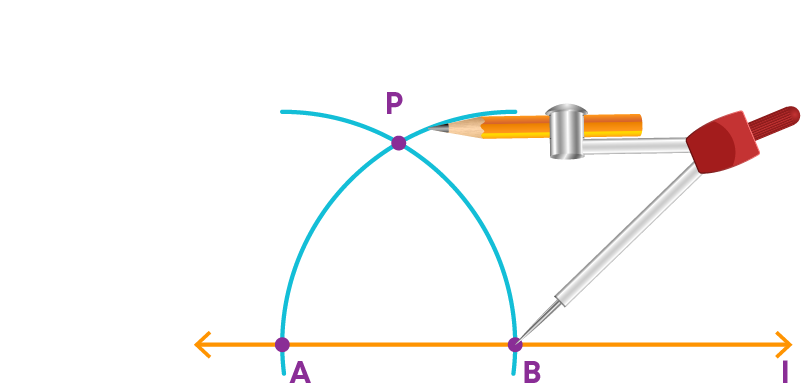
Step 3: Now, place the compasses pointer at B, draw an arc passing through A and cutting the previous arc at P.
Step 4: Draw a ray from A passing through P.
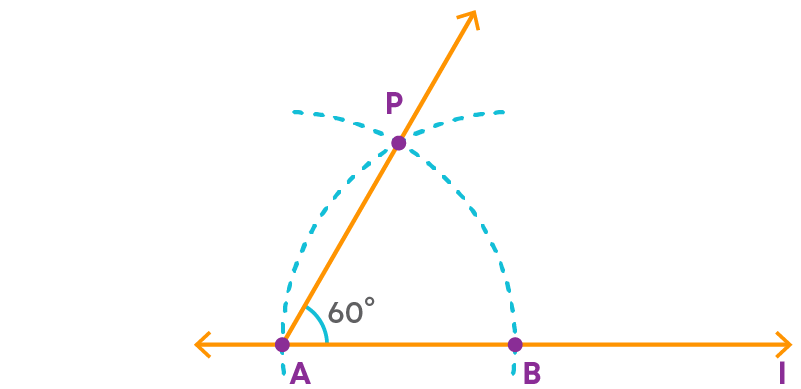
∠PAB is the required 60⁰ angle.
To construct a 30° angle follow the given steps:
Step 1: Construct a 60° angle.
Draw a line 'l' and mark a point A on it. Construct a 60° angle at A.

∠PAB is the required 60⁰ angle.
Step 2: Bisect 60° angle to get a 30° angle.

∠RAB is the required 30⁰ angle.
To construct a 15° angle follow the given steps:
Step 1: Construct a 60° angle.
Draw a line 'l' and mark a point A on it. Construct a 60° angle at A.
∠PAB is the required 60⁰ angle.
Step 2: Bisect 60° angle to get a 30° angle.
∠RAB is the required 30⁰ angle.
Step 2: Bisect 30° angle to get a 15° angle.

∠KAB is the required 15⁰ angle.
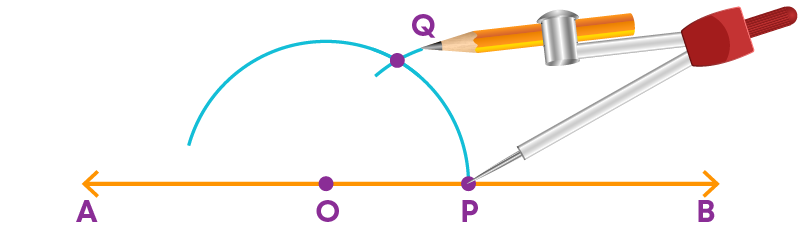
To construct a 120° angle, follow the given steps.
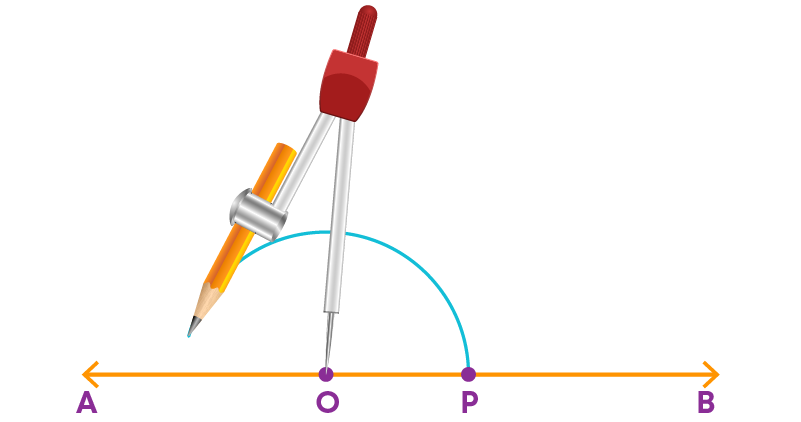
Step 1: Draw a line ‘AB’ and mark a point ‘O’ on it.

Step 2: Place the pointer of the compass at O and draw an arc of convenient radius which cuts the line at P.
Step 3: With the same radius and with P as the centre, draw an arc which cuts the first arc at Q.
Step 4: With the same radius and with Q as centre, draw an arc which cuts the previous arc at R.
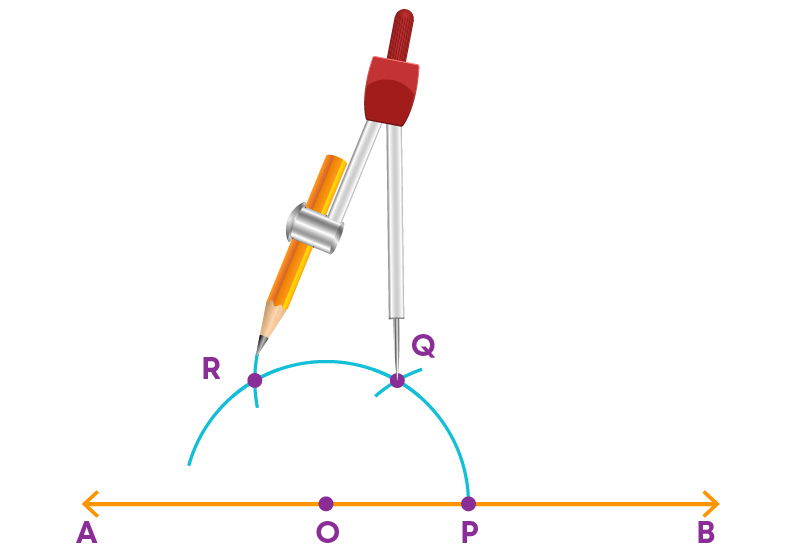
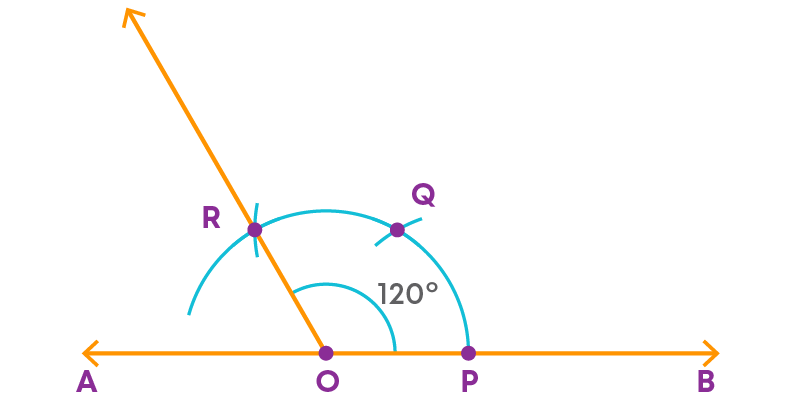
Step 5: Join O and R.
∠ROP is the required angle whose measure is 120⁰.
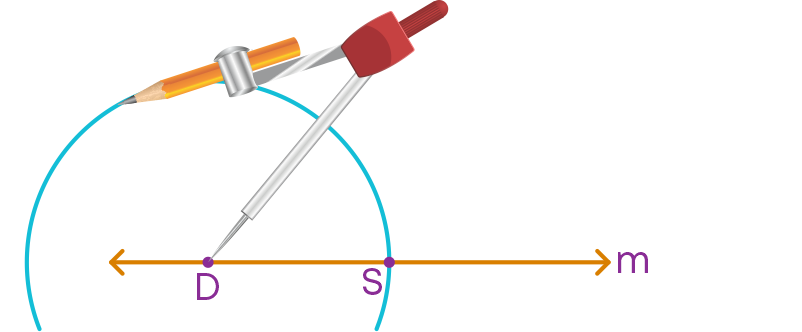
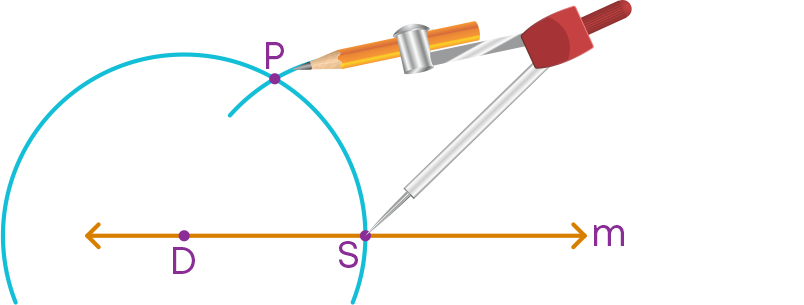
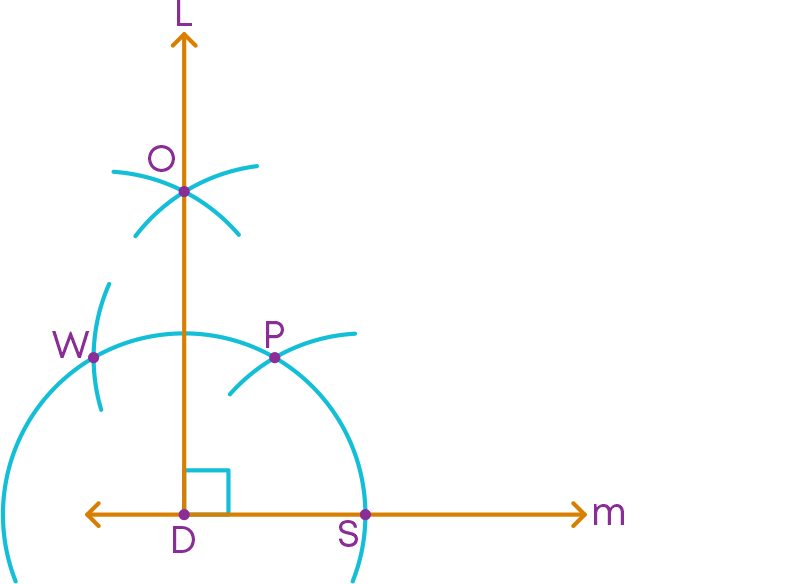
To construct a 90° angle, follow the given steps.
Step 1: Draw a line ‘m’ and mark a point D on it.

Step 2: With D as the centre and at a convenient radius, draw an arc cutting ‘m’ at S.
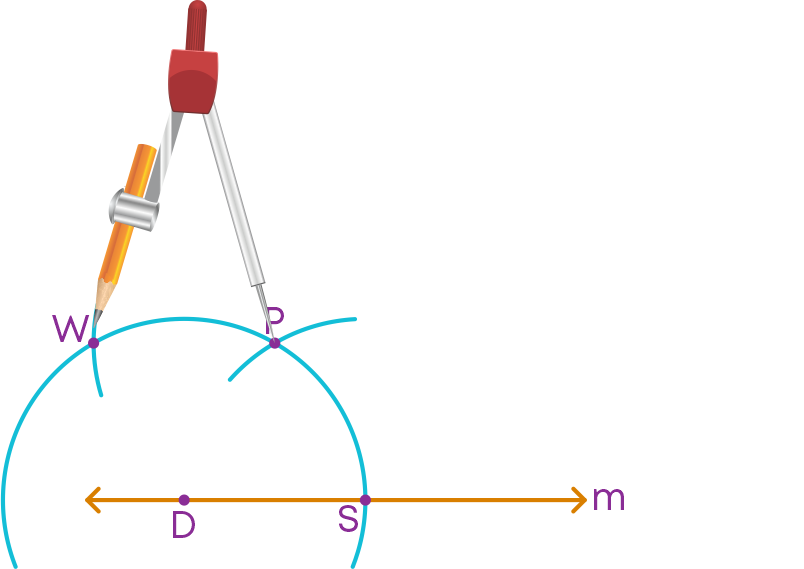
Step 3: With the same radius, place the compass pointer at S and cut the previous arc at P.
Step 4: With the same radius, place the compass pointer at P and cut the previous arc at W.
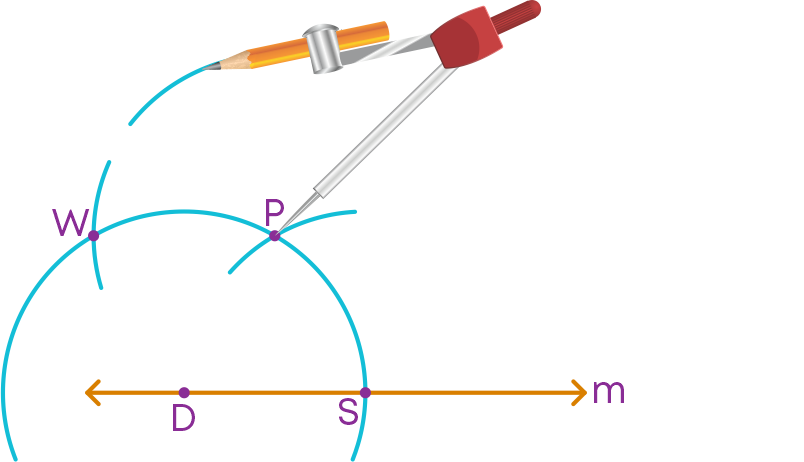
Step 5: Now, take a radius equal to DS, place the compass pointer at P and draw an arc.
Step 6: With the same radius, place the compass pointer at W and cut the previous arc at O.
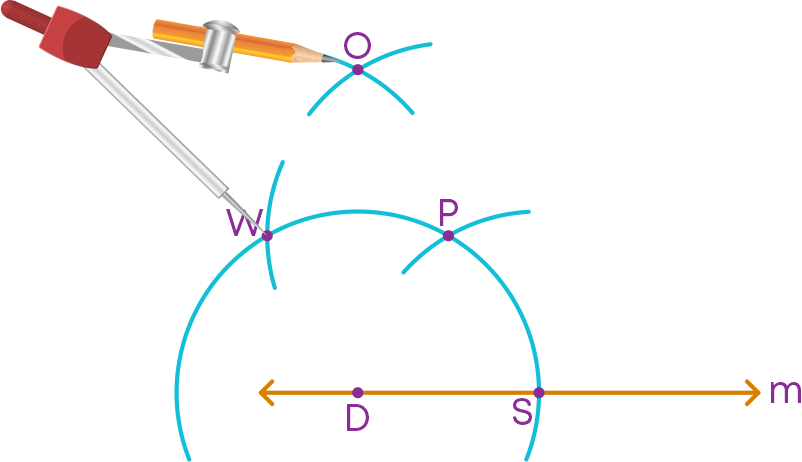
Step 7: Draw a line DL through O.
∠LDS is the required 90⁰ angle.

To construct 45° angle, follow these steps:
Step 1: Draw a line ‘m’ and mark a point D on it.

Step 2: Construct a 90° angle at D.
∠LDS is the required 90⁰ angle.
Step 3: Bisect the 90° angle to get the 45° angle.
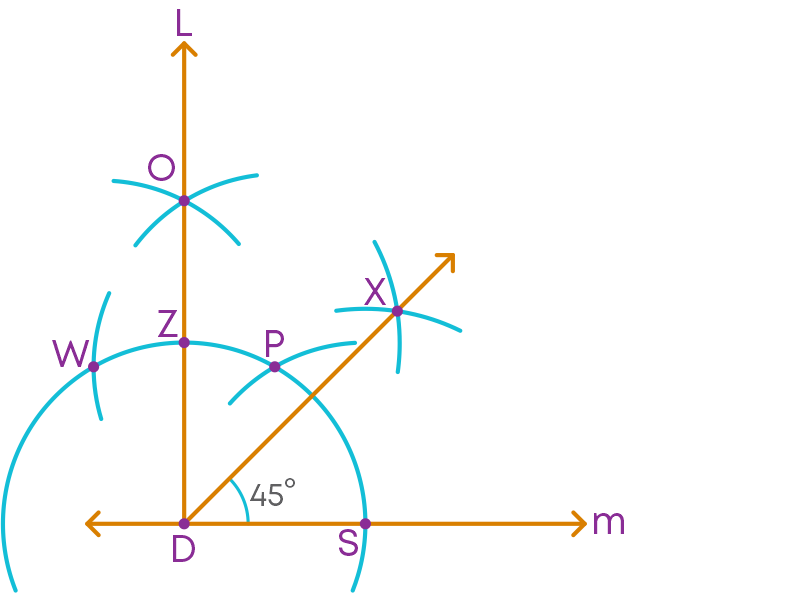
∠XDS is the required 45⁰ angle.
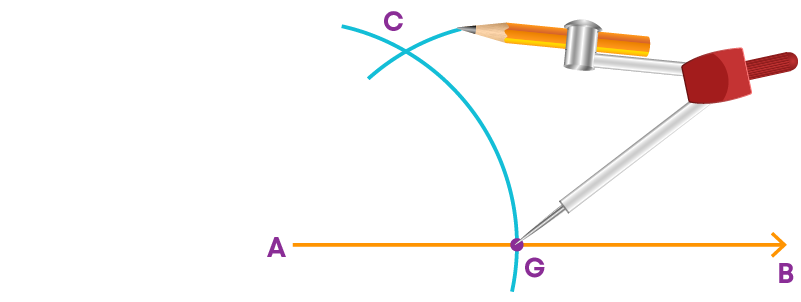
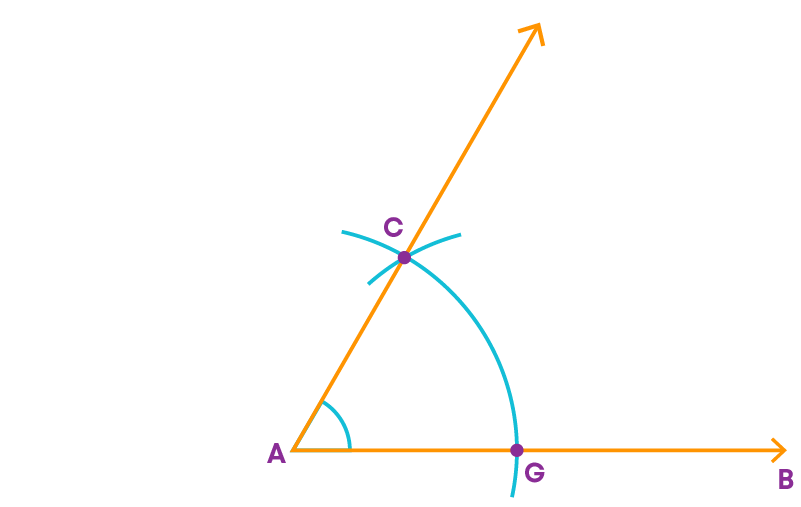
Steps to be followed for constructing a 135° angle:
Step 1: Draw a line CB and mark a point A on CB.

Step 2: Construct a 90° angle at A.
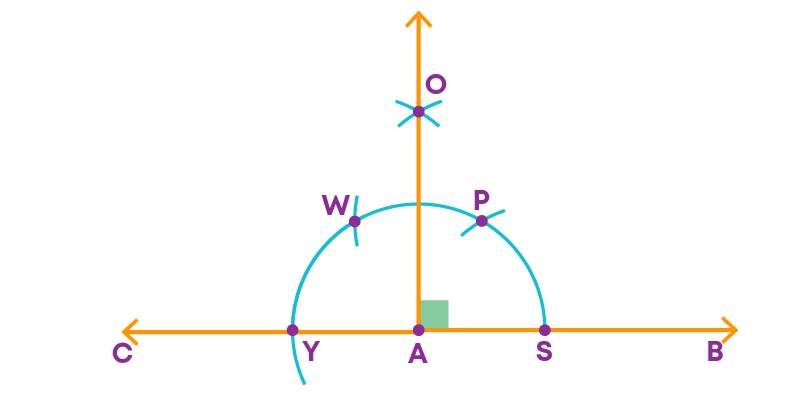
Step 3: Now, bisect the angle OAC.
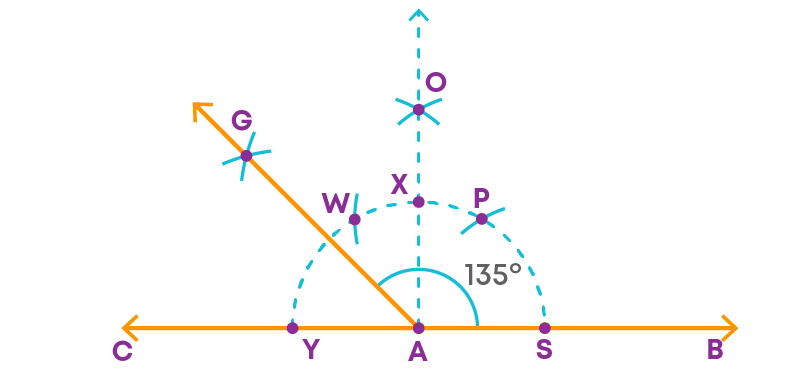
∠GAB = 135⁰.
Common Errors
The following are topics in which students make common mistakes when dealing with practical geometry:
- 1. Right way to draw an angle
- 2. Construction of a 60 degree angle
- 3. Construction of 45° angle and 30° angle
Right Way To Draw An Angle
When we draw an angle of some measure, remember these:
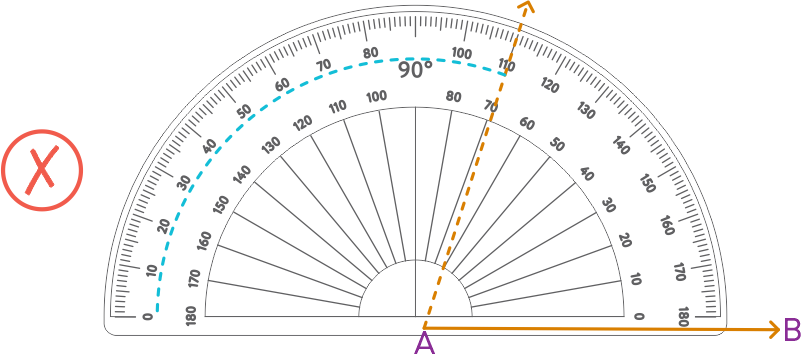
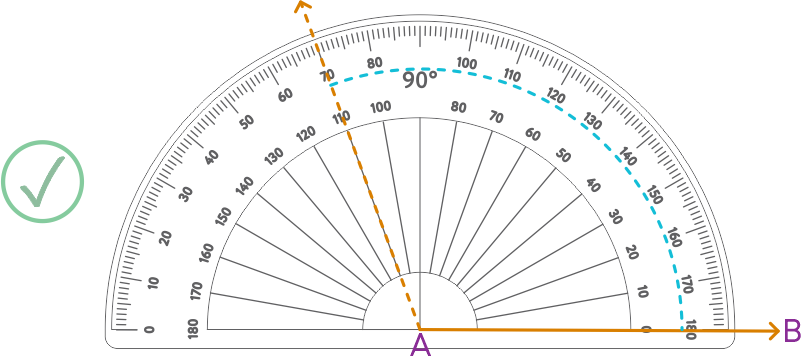
To draw an angle of 110°.
- Place the centre of the protractor at A and the zero edge along AB.
- Then start with the zero near B and measure 130°.
Construction Of A 60 Degree Angle
While constructing a 60- degree angle, make sure that the setting of the compass should not be changed throughout the construction.
Construction Of 45° Angle And 30° Angle
To construct 45°, we first construct 90° and bisect the 90° angle.
To construct 30°, we first construct 60° and bisect the 60° angle.
Conclusion
Can you solve this riddle after learning all about practical geometry?
Match the reflex angles with their construction:


Arpana
Author
Arpana is an education specialist with years of teaching Math and developing content. She previously worked as a freelance content developer, developing lesson plans for a reputed publisher of text books and content for various educational companies. She is an enthusiastic teacher who has taught students from India, the UK, and New Zealand.